


My daughters and I had a ball this week, crafting up these beautiful cards. We were inspired by the collection of pretty little bits and pieces we seem to have in abundance (some might say "excess"!): beads, stickers, glitter, feathers, buttons, silk flowers, sequins, ribbons, shells, fabric, sea glass… the list goes on (maybe you can relate?). We started playing around, just compiling some of these tiny, coveted treasures into themed groups. The groups were so enchanting, we had to find a way to preserve and share them.


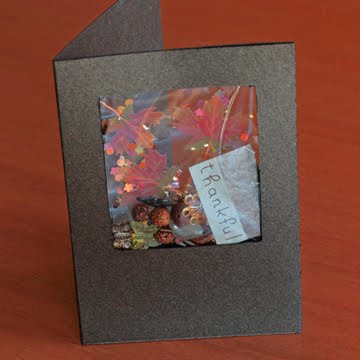
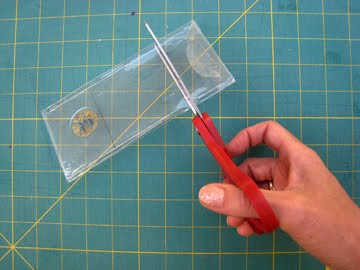


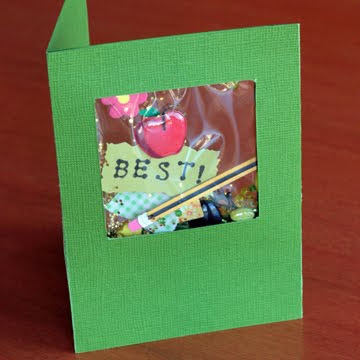
Ta-da! Tiny treasures greeting cards! Since the inspiration came from things we already had on hand, we wanted to try to do the entire project without spending a dime. Every single thing needed to make one of these cards is probably in your home already—even the clear plastic for the see-through window (If you’ve bought a greeting card, embellishment, or specialty paper recently, the plastic sleeve that protected that treasure gets a second life… protecting other treasures!).
Although an adult has to do most of the cutting, this is definitely a kid-friendly project. As long as they’re past that must-put-everything-I-see-in-mouth phase, they’ll have a great time gathering, sorting and bagging the treasures. And by watching and assisting an adult, they’ll learn a lot about the various tools, techniques and terms associated with crafting. My kids were totally captivated, watching me demonstrate, and they couldn’t wait to see their selected treasures showcased in the finished product. Now they keep asking me to please, please, please help them make more treasure cards! We’ve made cards for their friends, their teachers, their grandparents, and even for them to keep in their rooms.
We might not be able to make enough cards to deplete our entire beads-and-all-things-tiny inventory, but creating these cards is keeping us crafting without spending money... and bringing lots of smiles to lots of faces.
Instructions follow below. Let us know if you try it!
Pam
february 13 creative
project highlights
supplies
directions
1. Gather tiny treasures into themed collections (color-coordinated collections get extra-designery credit!).


Although an adult has to do most of the cutting, this is definitely a kid-friendly project. As long as they’re past that must-put-everything-I-see-in-mouth phase, they’ll have a great time gathering, sorting and bagging the treasures. And by watching and assisting an adult, they’ll learn a lot about the various tools, techniques and terms associated with crafting. My kids were totally captivated, watching me demonstrate, and they couldn’t wait to see their selected treasures showcased in the finished product. Now they keep asking me to please, please, please help them make more treasure cards! We’ve made cards for their friends, their teachers, their grandparents, and even for them to keep in their rooms.
We might not be able to make enough cards to deplete our entire beads-and-all-things-tiny inventory, but creating these cards is keeping us crafting without spending money... and bringing lots of smiles to lots of faces.
Instructions follow below. Let us know if you try it!
Pam
february 13 creative
project highlights
- folded greeting card with treasure window
- designed using materials found in your home
- inspired by all things tiny
- recycling and repurposing
- kid-friendly
supplies
- all things tiny: treasures and things (see suggestions below)
- 8.5" x 11" cardstock or larger (extra-sturdy construction paper could work as well)
- X-acto knife
- ruler
- pencil
- crystal clear bags/sleeves (recycled from embellishment packaging, greeting card protectors, paper protectors etc.)
- Sharpie marker
- scissors
- tape
- double-stick tape
directions
1. Gather tiny treasures into themed collections (color-coordinated collections get extra-designery credit!).


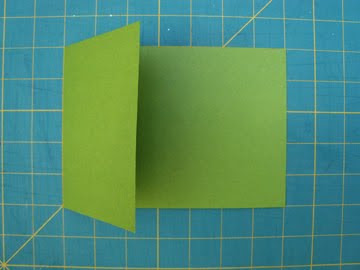
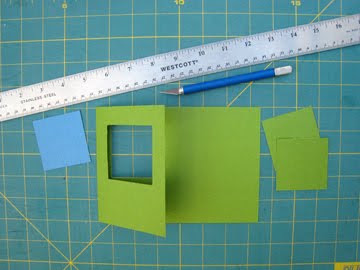
2. Cut from cardstock: one 10.5" x 5" rectangle.


3. Working with the length of the rectangle and from the left edge, score the rectangle at 3.5" and at 7". Fold panel 1 in and over panel 2. Set aside.
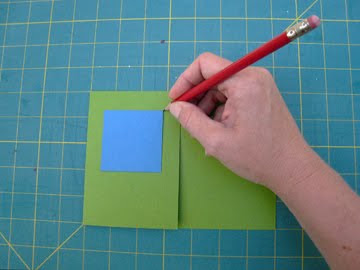
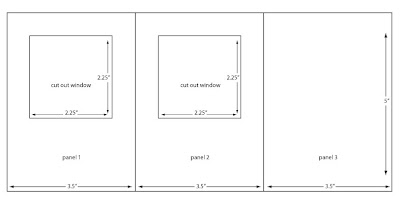 4. Using scrap paper, cut a 2.25" x 2.25" square. Place the square cutout on top of panel 1 which should be folded in over panel 2. Position the square cutout (either by eyeballing or by measuring) 6/8” from the top and 5/8” from each of the sides of panel 1. Now use the cutout as a template and trace just around the corners of the template. Then use an X-acto knife and ruler to cut out a square window opening. Be sure to cut through both panels 1 and 2 of your cardstock. Erase any leftover pencil markers.
5. Place your clear plastic bag over the cut out window. If your plastic bag needs to be cleaned, now is the time to use a soft sponge and a bit of warm soapy water to do so. Dry it off with a dish towel. Then use a Sharpie marker to mark the bag about 1/4" beyond the cutout window. Trim the bag to the size indicated by the Sharpie marker. Then tape up three sides of the bag leaving one side open to fill with your gathered treasures. When taping, use the narrowest pieces of tape possible so the tape does not show through final window (cutting standard-width tape in half lengthwise works just fine).


 4. Using scrap paper, cut a 2.25" x 2.25" square. Place the square cutout on top of panel 1 which should be folded in over panel 2. Position the square cutout (either by eyeballing or by measuring) 6/8” from the top and 5/8” from each of the sides of panel 1. Now use the cutout as a template and trace just around the corners of the template. Then use an X-acto knife and ruler to cut out a square window opening. Be sure to cut through both panels 1 and 2 of your cardstock. Erase any leftover pencil markers.

5. Place your clear plastic bag over the cut out window. If your plastic bag needs to be cleaned, now is the time to use a soft sponge and a bit of warm soapy water to do so. Dry it off with a dish towel. Then use a Sharpie marker to mark the bag about 1/4" beyond the cutout window. Trim the bag to the size indicated by the Sharpie marker. Then tape up three sides of the bag leaving one side open to fill with your gathered treasures. When taping, use the narrowest pieces of tape possible so the tape does not show through final window (cutting standard-width tape in half lengthwise works just fine).


6. Now fill the bag with your treasures. When ready, tape closed the last open side. Fold panel 3 inward, along the 7” score mark. Then tape your bag of treasures onto panel 2. Make sure that your bag of treasures is face down and is correctly facing out the front of the card. Shake the treasures away from each side as you tape it down.

 7. Apply double-stick tape to all of panel 2 with the exception of the window. Fold panel 1 onto panel 2 . Press panel 1 onto panel 2 making sure that panel 1 is absolutely secured.

8. You’ve just completed your first treasure card! If you’d like to write a greeting inside and you don’t want it to be seen through the window, be sure to write on the bottom third of the inside of the card.
possible card themes
 7. Apply double-stick tape to all of panel 2 with the exception of the window. Fold panel 1 onto panel 2 . Press panel 1 onto panel 2 making sure that panel 1 is absolutely secured.
8. You’ve just completed your first treasure card! If you’d like to write a greeting inside and you don’t want it to be seen through the window, be sure to write on the bottom third of the inside of the card.

- new year
- valentine's/love
- new baby
- birthday
- easter
- 4th of July
- graduation
- mother's/father's day
- grandparent's day
- halloween
- thanksgiving
- hanukkah
- christmas
- thinking of you
- teacher
- get well
- bon voyage
- sports
- paper and foam stickers
- leaves or flowers, silk or dried
- beads
- large glitter
- sequins
- Ribbons
- confetti
- die-cut decorations
- feathers
- shells
- alphabet stickers, rubber stamps
- pipe cleaners
- fabric swatches
- buttons
- trinkets/charms
- faux jewels
- specialty papers
- sea glass
- children’s drawings or doodles
- using two-sided objects work very well, as the window is see-through from both the outside and the inside of the card
- including extra small, small, medium, large and extra large elements produces great results… contrast!
- You can lightly adhere some items to the inside back panel of the plastic bag if you like, using the self-adhesive (like on stickers) or a tiny piece of double-stick tape. You’ll definitely want to leave most items free-floating, however, as that’s part of the fun of the finished card.
- This finished card size fits in a 3 5/8” x 5 1/8” envelope, which you can find at most stationery stores if you don’t have one on hand.
- If you want to mail your card and it contains some bulkier treasures, you might want to protect it inside the envelope by including a piece of cardboard.
- Once you’ve got the hang of it, experiment with other card sizes and window shapes.


22 comments:
This is AWESOME! Thank you for a great idea!
My dd is really into collecting tiny objects right now and would love this!
What a great idea! If you would like, submit this craft concept to for exposure to 500 visitors a day! Just click on our name above.
Great way to recycle! Do you sell these cards--I've seen them in stores before. Thanks for the wonderful project!
ellyandphil: So glad you like them! We don't sell them, but were definitely inspired by similar things we've seen out there. Let us know if you try it!
These are great - I can't wait to clear off my desk and have a go :)
This is absolutely a fantastic idea. Thank you , you are really original!
These are so beautiful! I love LOOOVE the Thankful one. I've linked to this on my site www.funfamilytips.com
Gorgeous and so creative!
Great feedback everyone! It makes me so happy that you love this unique project and that you are going to give the treasure cards a go! Think "Halloween"! Let us know how it goes!
Such a sweet idea! !!!!
TYFS!!
Awesome Idea.
I love this crafty card idea! I can also see using clear ATC sleeves for this project. Even though they would produce a smaller window, maybe you could do two smaller windows on the front!
Pam, this is sooooo darn cute!!! Can't wait to do stuff like this with Lily.
I just found this site and I love it already. This is a wonderful idea for all those little extras that we never want to throw away.
thanks!
Thank you everyone!
I am so addicted to making these treasure cards right now that I've got a whole space dedicated to treasure card crafting! I've even made some small, square ones to attach to the bottles of wine or gifts during the holidays. Each card is so special and fun!
I like these tiny cards, thanks for sharing this idea.
What a brilliant idea. I always seem to keep odd bits, like a nice piece of wrapping paper or a bead. I would love to try this idea out.
Thanks for sharing.
Hi!
Today I posted an entry on my blog with a link to this post.
I'd apprecaite your letting me know if that's OK.
Thanks,
Nancy Ward
http://paperfriendly.blogspot.com
The more people that have access to this very fun treasure card project the better, Nancy!
What a terrific idea. Your tutorial is very well done. I will be looking at all those bits and pieces differently now.
Wow! How genius and very innovative. I like your idea of re-using your stash for another wonderful creation. Good...oh no, not just good but GREAT JOB!!!
P.S.
Saw your creation from Papercraft Inspirations.
Hugs,
Ria C
It's My Party
Handmade with Love
In My Home
What an absolutely brilliant idea! Thanks for sharing!
Post a Comment